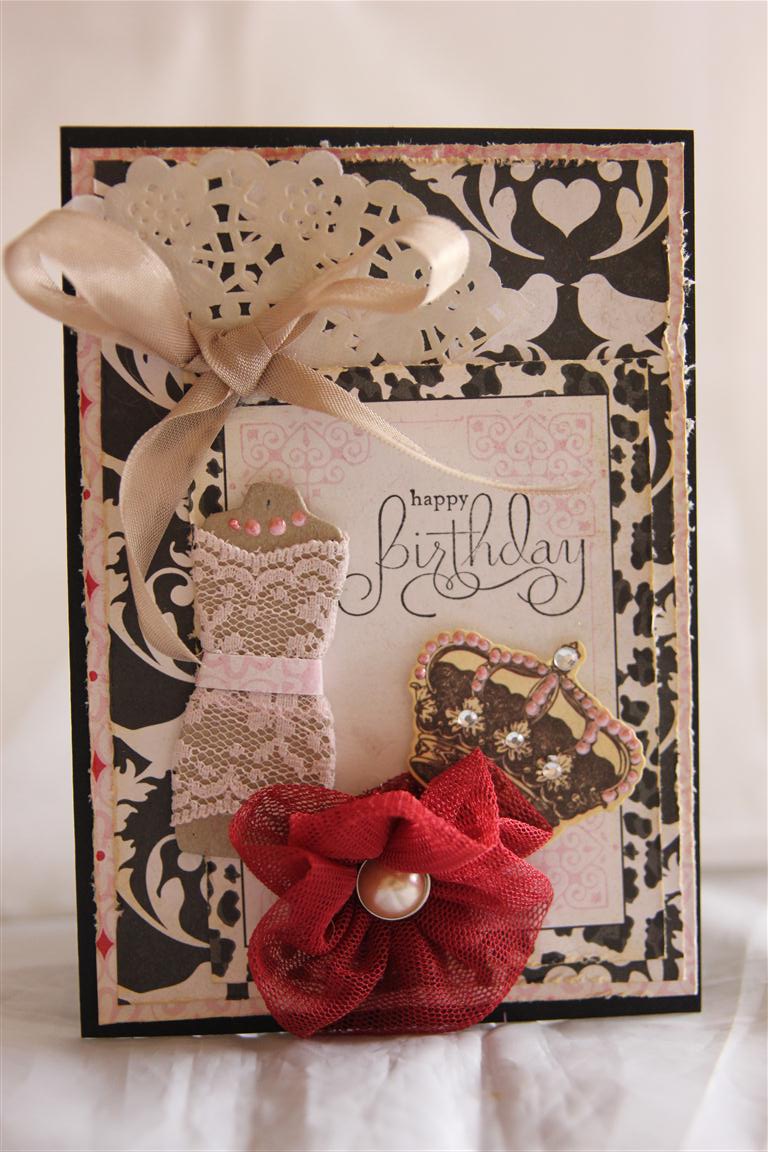
 I only bought a few 12 x 12 sheets from this range of paper – Echo Park Love story – and have only made a few cards with it so far – I have put it aside for now to work on some classes, but I thought I would show you what I have created so far. I used a base of black cardstock, and layered a couple of the papers on top – after distressing and inking the edges. I then raided my bits and pieces drawer, and found this chipboard dress form and crown which I decorated.I inked a doily, and added it, as well as a seam binding bow. I made the flower by folding a length of netting in half lengthways and sewing a running stitch along the raw edge before pulling the thread to gather it. I threaded a brad ( kaisercraft) through the centre. These are amazingly easy to make, and I am going to sit in front of the t.v. tonight and make some more!This style is my cleaned up take on shabby chic, and it’s my favourite at the moment, so I think my ladies will be making some cards in April to this style too! Til tomorrow….
Category: Flowers
Stamping fun
 Hi, hope everyone is well. We will be jumping about a bit this next week, as I want to clear a few folders before we really start to get serious about Christmas ( and all my great new stuff that I am picking up on the weekend – great excitement!). this is a card I made a little while ago, and I have used a few different stamp companies to get this look! The cardstock is Stampin Up Wisteria Wonder, and Very Vanilla,and the ink used is tim holtz Milled lavender and Shabby shutters. I carefully used both pads on the flower stamp ( from stampin Up Bloomin with Beauty set) and once stamped coloured lightly with the same inks.The background stamp used for the back of the flower was Stampers Anonymous Bitty Grunge Background ( some great stamps in this set – I haven’t played with them enough). I made a mask of the flower, positioned it over the original stamped version and then stamped my background. When the mask is removed the flower appears to be in front of the background. Might have to do a video on that technique…..Anyway, the script stamp at the very back is Stamp It Butterfly script. It is the only script stamp I have so its very well inked.All background stamping is the same lavender ink as the flower.I had a great morning setting up my October class for Paper Flourish, and got a sneaky look at the Kaisercraft Papers for October, we are in for a treat!It was the first time I had been able to craft all week, as it’s been a very busy week, so I had those cards done in no time!I have spent the rest of the day in the card room doing a huge order and I will continue on after tea. Til tomorrow….
Summer smooches number 2
 Very quick post tonight as it’s shopping night! The paper here is Stampin Up summer Smooches, and I also used the matching summer smooches fabric to die cut the flowers with my stampin up party blossoms die. The fabric was also used for the flower stems. I cut a tag and used stampin Up petite pairs stamp for the tag.Til tomorrow….
Large fuschia stamp card

I am hoping the photo comes up with this post – things are not right, but Nathan is otherwise occupied so we will carry on, and he may have to fix things later. A little while ago I did a youtube video on how I colour my stamped images, and this is the stamp I was colouring with distress inks, and what happened to it after the camera was turned off! I had a couple of coloured images so I cut into one of them to create a 3d topper, and then matted it onto Stampin up cardstock – Wisteria Wonder and Pink Pirouette. The embossing folder was Craft Concepts Cottage Florals, the stamp was Kaszazz Large Fuschia stamp and I finished of the card with some ribbon and perfect pearls.Must go as tea is ready, til tomorrow….
Lakehouse number 2
 Here is number 2 in my Kaisercraft Lakehouse collection, this time using papers from the 6″ pad. I fussy cut around the floral piece in the pad ( love it) and backed it with the striped piece. All that was left to do was punch a couple of butterflies with my Martha Stewart butterfly punch, and add the greeting and some kindyglitz. I think this is my favourite card! Well thats the weekend over – a very short one for me this week as I only had today off, but looking forward to the end of this week when I have 4 days off – yay! Til tomorrow….
Magnolia grove 3
 Still with kaisercraft Magnolia Grove papers, this time the 6″ pad,a flourish die cut from my memory box fauntleroy crest and another of my homemade crocheted doilies, prima stick pin lovely silk ribbon and a flower which has a story…. One day at the market the lady on the next stall had antique bits and pieces including a stool with a straw hat on it . someone bought the stool but didn’t want the straw hat – but it was covered in these roses so I offered to buy it and such a nice lady – she gave it to me! I am now the pround owner of 50 of these roses, so you will see them pop up now and again! Til tomorrow….
English rose stamp number 3
 here is my final card in my Kaisercraft English Rose stamp series. This time I have teamed it with Kaisercraft Madame Boutique paper for a totally different look. I coloured it with tim holtz distress inks and my aquabrush, and used the Cheery Lyn Polynesian sails oval die. I also used Memory box moonlight butterfly and kaliedascope butterfly dies, and the For You sentiment was stamped using a stamp from Stampin Up elements of Style set and fussy cut. It’s been very cold here today, and I am thinking of dragging the heater into the card room before I go through there later! Til tomorrow….
English rose stamp number 2
 Yesterday i showed you 3 cards simply stamped and coloured with my Kaisercraft English Rose stamp. Today I am showing you what happened next with the same stamp – I stepped it up a little and did some “what ifs” so – the papers I used were Bo Bunny Weekend market, and I stamped a script stamp ( Stamp It Butterfly script but any would do) across the whole of the beige coloured patterned paper. I stamped Post Card across the top ( Prima stamp) and stamped a stamp ( My minds eye Rosy Everything set) onto cardstock, cut it out and stuck it on the corner. You will also notice that I mix and match my stamp sets – just cos they come in the same packet doesn’t mean you can only use them together!Now I stamped my English Rose on the centre of the card and coloured it with my little pots of perfect pearls powder. For those of you following closely ( and I know there are a few of you because I have had e-mails asking about colouring my images, and so I am putting together a short video stepping out the methods I use)the way I did this – I hand coloured my image with a Versamark pen, and then used a paintbrush to paint the powder on. The beauty with this technique is you don’t have to be perfect – the powder only sticks to where the versamark pen has been.And the flowers have a glorious shine to them!Today I have made great inroads on the male card front and have lots to photo for future blogs! Til tomorrow…..
A found stamp…
 While I was looking for something else entirely I found a stamp I had purchased at the same time I bought the matching papers ( kaisercraft English Rose) and filed away and then promptly forgot about, so I thought it was about time it was inked up, and I made this series of cards, same design, just changing the colourways.I used my new Cheery Lyn Polynesian sails Oval die, and coloured the stamped images with Tim Holtz distress inks and an aquabrush.I have found the perfect paper for male themed cards, ( Simple stories Awesome) and today I have been on a creative roll making lots of boys and mens cards.Til tomorrow….
Prima meadowlark number 5
 After a detour yesterday we are back to my Prima Meadow lark collection series – this is the second to last card in this series, and for this one I have covered the whole card base with this gorgeous paper, and added flowers and ribbon, I stamped a stampin Up perfectly penned sentiment onto a pice of paper from the same collection and fussy cut it out. The butterflies are punched out with a martha stewart punch.I did make a start on my village lesson cards, but had to put them to one side while I fulfilled an order, which I am still doing.I have also booked my stall at the salisbury craft fair which is being held in June, but I will have more info on that available on my Market button ( on my home page) in the next week or so… Til tomorrow….
